Saturday 13 December 2014

The joys of moving to a new CentOS version, libvirt and Puppet

After a long time of running, or at least trying to run, virtual hosts on my 5 year old hardware I decided to splash out and get a new host.

Out goes the old AMD Phenom 4 gig ram and in with an AMD A10 16 gig ram.

First thing was to install a new CentOS 7 with libvirt (I just cannot get openstack to work ).

The CentOS install was very easy with a pxe boot out of my dnsmasq server. Got it up and running in 1/2  hour as I have been spinning up CentOS7 box in libvirt for a while.

Next, Puppet Enterprise 3.3.0. This is now a trivial task I have setup the pe_repo and its just a
curl -k https://${PE_SERVER_IP}:8140/packages/current/install.bash | bash

Now I have puppet running on the VM host box but the virt module (modified version of carlasousa/virt ) was having issues as I needed to install the ruby-libvirt gems and there is not one for CentOS7. This is where the fun begins......

Now PE uses its own version of ruby (1.9) where as the OS is ruby 2.0
This leads to a slightly complicated way of installing the gem files in PE.

  1. git clone the ruby-livirt repo     git clone git://libvirt.org/ruby-libvirt.git
  2. install all the packages that the autobuild script complains about
  3. once the build is finished you will find a gem file in the pkg directory
  4. gem install the file with "Puppet" version of gem
It was the last one that brought me undone for some time. Unfortunately you cannot just do a gem install as it pulls the wrong version and it still fails.

Shortly I will be releasing my version of puppet virt into the wild as it allows for some more good things when working with kvm and libvirt


Thursday 25 September 2014

More X10 - light dimmer and timers...

Thought it was about time for me to finally get back to work and make my X10 irrigation work.

So now I have added a 4 port relay card to the project to control my zones and have broken out the code to be in functions for controlling the interface. I also have moved over to using a 16*16 array for storage of all the settings for the controls.

I still need to set up the relays to use X10 dimming code to set a timer limit for the outputs and then it will just need to be wired up.

Have a look at the code over at https://github.com/jlcox1970/arduino

Happy days

Wednesday 20 August 2014

ADSB - Part 2 or I now have a public server to display locations on

As you might have seen in a previous post I have been working an ADSB receiver for my UAV.

Well now I have also created a server with the web front end running on it at http://globelock.dyndns.org:8081/

I still find it amazing how far away I can pick up aircraft from the standard antenna sitting on my roof


Thursday 14 August 2014

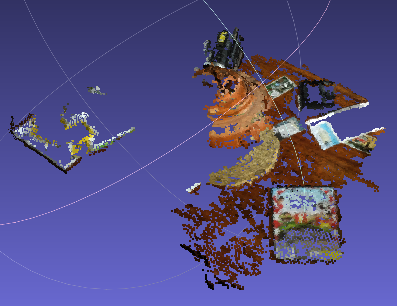
Structure from an un-ordered set of photos


For quite some time now I have been working on how to get a 3d-mesh from a set of photos working so that I can have real-time terrain mapping on the UAV using the 2 on board cameras.
After search the web and finding a lot of pre-compiled binaries that would work on the ARM CPUS that are in the UAV I finally found some source code. The unfortunate thing is that it all has some very vague instructions on how to get it up and running...

The software I found was the following:
  • meshlab (installed via package on Fedora)
    • Viewer for point cloud data and exporter for other tools like blender


So after many tests the process was as follows:
  1. take a set of photos with my Samsung Galaxy S3 phone
  2. Run RunBundler.py (from osm-bundler) with the --photos option pointing to the directory containing a copy of photos from phone
    •  The first time you also need to run RunBundler with the --checkCameraDatabase to create an entry in the camera database for the focal length. I skipped this as I thought it was not needed. In the end I set it 12 (12mm) as that should be about right for this phone camera.
  3. The above creates a directory in /tmp, cd into that directory
  4. run Bundle2PMVS list.txt bundle/bundle.out
    This will create some files in a subdirectory named 'pmvs'
  5. Edit 'pmvs/prep_pmvs.sh' supplying a path for the binaries
  6. run the above file
  7. run pmvs2 pmvs/ pmvs_options.txtThis will now have created the dense point cloud in 'pmvs/models/pmvs_options.txt.ply'
    This file can now be used in meshlab

Wednesday 25 June 2014

The Puppet modules - Part 3 (EnterpriseDB)

Over the last year or so I have been working on a Puppet module to replicate PostgreSQL databases between servers. Whilst this is working sort of (trying to merge this with the open source PostgreSQL server is hard and I haven't even start to look at PE internal DB), I decided that a cleaner approach was needed where I could have full control.

Enter PostgresPlus (EnterpriseDB), this version is available commercially and had no modules in the forge to work with.

In starting this I began with creating a manifest that would install the server which was simple enough. When it came to adding in roles,users and databases I found that it was easiest to just merge in parts of the existing Puppetlabs PostgreSQL module. 

Once all of this was done it was time to move onto the replication.

Replication is done through using exported resources. These are similar to virtual resources in that you use @ and spaceships with three major differances.
  1. The class/function is exported with @@
  2. The class/function is substantiated with <<|  |>>
  3. Requires a PuppetDB to work
So now in addition to the usual PostgreSQL module functions we also have classes for master and target.
By attaching the master class to the server it will push back an exported resource to the PuppetDB with a tag.
When we add the target class to the target server it will pull out the exported resource from the PuppetDB and apply it on this node, creating the configuration files for replication to start working.

This will also allow for dynamic creation of target nodes with as many as is required, even with the master in full production.

The Puppet modules - Part 2 (389DS)

This time around I thought I would tackle something a bit more challenging, 389 Directory Service ( jlcox/ds_389 )

Anyone who has gone through setting up an LDAP server knows that it can be hard to get it the state that you need for production and once it is there it is hard to maintain.

Enter Puppet.

This module now installs the service and can process in add or modify ldif files. It can also turn on encryption of the database fields if required.

The Puppet Modules

As of late my employment has had me working 100% within Puppet writing modules for Government Organistations and large Australian corporations.

In doing all this work I decided it was about time that I created a few public modules for all to use.

The first in the series is on to make VIM setup rodjek puppet-vim so that it is easier to actually write some manifest files. This module ( jlcox/vim_puppet ) allows you to set up an array of users that will need this configured. Once configured simply apply and enjoy the goodness.....


Saturday 10 May 2014

Update to flight computers

I now have the second flight computer, a beagle bone black.

The problem is that for some reason they install Angstrom on it as a default OS. Really!

As I am a Redhat person due to my professional work I have decided to migrate both the BBB and RPi over to using either a Fedora or CentOS distro.

Tuesday 22 April 2014

Kitting out the airframe

I have started to kit out the airframe.
This is the 4s lipo (center battery) for the APM
Also there are 2 x 3s lipo (rebuilt from old laptop batteries) that are for the flight computers.
The main APM battery lasts for around 5 hours so I am also building a battery change over to switch to a backup battery if it runs low. I would like to achieve a total flight time of around 10 hours
    

Sunday 23 March 2014

ADS-B reciver is now working

A few weeks ago I bought some RTL receivers with a plan of using them to pick up the ADS-B transponders that all commercial aircraft in Australia must have.

After testing these units with MythTV as a TV broadcast receiver and finding that the supplied antenna was not good enough for the job I moved over to ADS-B.

Not expecting much, I was surprised when they started to pick up planes in the area


This was actually very easy to do with a program called dump1090.(instructions are at https://docs.google.com/file/d/0B_tFEQ4o1RoTdmtndE9nWmFGUnM/edit )

Next is to use this information to feed into the navigation computer for the start of an avoidance system

Friday 21 February 2014

Need a serial comms protocol for rs485

I have worked out that I need to have several computers on plane:-
 1. Ground comms
 2. Flight control and waypoint intergrater
 3. APM interface
 4. Image processing

My idea is to run to serial bus links both in a multi-master arrangement. The link will need to have a watchdog running, and if a path cannot be made it will switch to the second link.

I will need to send mavlink and files across the link. I understand that I could possibly extend mavlink to also send files and images, but will it handle the flight control and a fairly continuous stream of images and 3d mesh.

The bus will also need to have some addressing and work on non-guaranteed communication. Whilst not expecting any connection issues, it must be catered for and as the data has a short time to live, protocols like TCP are not appropriate.
 

Sunday 9 February 2014

Setting up an APM is not always easy....

It's been a while since my last post as I have been trying to get the APM to work.
It turns out that JP1 on the APM appears to not power the servo out as stated in the manual. But this is not a problem as I will be using a BEC in-line after the Power Module for the APM.

I have also decided to change the power over to Lipo batteries as I want to drop the weight in the plane.

Also got the remote to change between stabilized and auto flight.

Saturday 11 January 2014

Sending bi-directional data from serial port across UDP

One small issue on the glider.
How do I send data between the APM and the ground station economically.
I originally was using a TCP connection (ser2net) but was having issues with packet loss and connection drop outs. This  was a problem as each time I would have to reconnect and initialise the link. Not a good thing whilst flying.

So after a bit of research I have moved over to socat. One command and the link is up :)
 
scocat UDP-LISTEN:5761 /dev/ttyACM0,raw

So what does this do, it sets up a UDP server on port 5761 that is connected to the serial port ttyACM0.
This allows the ground control software to talk to the APM directly and if packets are drop,missing or wrong order they are ignored.
If this was TCP then each of these errors would cause a resend for the point at which the error occurred

Friday 3 January 2014

Autopilot has arrived

In record time the APM arrived today.

Now coming to grips with qgroundcontrol as MissionPlanner requires Windows which I dont have.

Next to connect it up to both the plane and the raspberrypi
 
The APM is in the middle, compass/gps on the left and the battery voltage/current sensor at the bottom.